Introduction to InnexDATA
What is InnexDATA?
InnexDATA: The Plugin to Integrate Analytics and Advertising Tools with Your Shop
InnexDATA is the plugin that allows you to integrate all analytics and advertising tools into your shop through Google Tag Manager (GTM). With InnexDATA, you can track all key events and touchpoints on your website, ensuring you never miss out on any critical information.
We’ve released the new version 2.0 of the plugin, making it robust, efficient, and functional for all types of Shopify stores.
A Product Born from Martech Expertise
InnexDATA was launched in 2024 by Instilla, an Italian Martech agency based in Milan. With proven expertise, Instilla boasts a series of success stories across all digital business lines, including tracking solutions.
The need for a new tool arose from the desire to provide everyone with a clear and tangible real-time view of all potential digital strategies, thanks to complete and accurate data. InnexDATA supports platforms such as GA4 and advertising platforms like Meta, Google Ads, Bing, and many others.
Why Choose InnexDATA?
InnexDATA: The First Italian Plugin Developed by a Digital-Focused Agency
InnexDATA is the first Italian plugin entirely developed by an agency that works daily in the digital space. This allowed InnexDATA’s developers, in collaboration with the Tracking team, to manage the entire tracking infrastructure following standard rules while adding various power-ups. These enhancements enable the collection of additional data across different platforms.
Designed for Everyone: From Non-Technical to Technical Users
InnexDATA was specifically created for everyone:
- Non-technical users who rely on tools like GA4 to monitor their business.
- Technical users who work more intensively with various tools and extract complex data.
Thanks to InnexDATA, it’s now possible to extract the full potential and complexity of data, providing deeper insights and improved tracking capabilities.
Installation and Setup
System Requirements
Before Starting the Installation of InnexDATA, Make Sure You Have:
- An active Shopify store
- Administrative access to your Shopify store
- Access to a Google Tag Manager account (it can be an existing account or a new one)
Installation Process
Access Your Shopify Admin
1. Go to the Shopify App Store:
- Search for "InnexDATA" in the search bar.
2. Select the app from the results.
Install the App:
- Click on "Add App".
- Grant the required permissions.
Complete Initial Setup:
- Follow the step-by-step configuration wizard.
- Select the platforms you want to integrate.
Configuration Wizard
Our Wizard Will Guide You Through the Setup Process with Clear and Simple Steps:
- Platform Selection: Choose which analytics and marketing platforms you want to integrate (GA4, Meta, TikTok, etc.).
- Event Configuration: Customize which events you want to track on your store.
- Installation Check: An automated system will verify that everything is set up correctly.
DataLater Implementation
What Are Data Layers?
Data layers are JavaScript data structures that store and organize information about the events occurring on your website. This data is then used by analytics tools like Google Analytics and advertising platforms to provide insights and optimize marketing campaigns.
Standard Google Implementation
InnexDATA implements data layers by strictly adhering to Google's standards, ensuring:
- Full compatibility with Google Analytics 4 and other Google platforms
- Optimized data structure to maximize the quality of the collected information
- Automatic updates to remain compliant with the latest guidelines
Events Tracked
InnexDATA implements a complete e-commerce event tracking system using structured data layers injected directly into the Shopify theme. Events strictly adhere to the technical specifications of Google Analytics 4 and are compatible with all major advertising platforms. Every significant user interaction — from product views to purchase completion — is captured using standardized data layer objects that include detailed information about products (SKU, variants, price), navigation (lists, categories), and conversion metrics. This standards-compliant implementation ensures maximum interoperability with analytics and advertising platforms, enabling granular user behavior analysis and accurate ad ROI optimization.
A distinctive feature of the plugin is the use of the suffix _ix (e.g., view_item_list_ix instead of view_item_list) for all tracked events. This custom naming convention clearly distinguishes events generated by InnexDATA from those potentially implemented by other tools, avoiding conflicts and data overlaps. While it is generally advisable to use only one tracking system at a time, this strategy ensures the safe coexistence of multiple solutions. It is important to note that the suffix does not compromise the standardization of events, as the parameter structure remains fully compliant with the specifications of Google Analytics 4 and integrated advertising platforms. This ensures a robust and compatible implementation across the entire digital marketing ecosystem.
Below, we will analyze each tracked event and its specific values.
View Item List
The View Item List event is a key milestone in tracking the user’s purchase journey, triggered when a collection or product list is viewed. The associated dataLayer includes the unique identifier of the list (item_list_id), the name of the category or collection (item_list_name), and a detailed array of products.
Each product within the items array contains complete attributes:
- ID
- SKU
- Name
- Brand
- Position in the list (index)
- Category hierarchy (up to 5 levels)
- Variant
- Price
- Currency
This granular tracking enables precise analysis of which collections generate the most interest and which products capture users’ attention in specific viewing contexts.
Select Item
The select_item_ix event plays a strategic role in tracking the user's journey, activating when a visitor clicks on a product within a list or collection. This event fills a critical analytical gap by distinguishing products intentionally navigated to (via clicks) from those reached through direct product page landings.
The dataLayer includes the identifier of the originating list (item_list_id), the name of the collection (item_list_name), the currency, and the value of the selected product. The items array contains detailed information about the clicked product: ID, SKU, name, brand, position within the list, full category hierarchy, selected variant, and price.
This level of granularity allows for sophisticated analysis of product placement effectiveness within collections, the attractiveness of specific items, and the correlation between clicks and subsequent conversions, thereby optimizing both the navigation experience and the architecture of collections in the online store.
View Item
The View Item Event (view_item_ix)
The view_item_ix event is a fundamental part of the conversion journey, triggered when a user views the detailed page of a single product. This critical moment often marks the transition from general interest to specific purchase consideration.
The dataLayer implements a rich and standardized structure that includes the currency used, the monetary value of the viewed product, and the identifier of the originating list when applicable (allowing the tracking of the user’s navigation path). The items array contains a detailed object with complete product information: unique ID and SKU, full name, brand, a hierarchy of up to five levels of categorization (facilitating granular merchandising analysis), details about the specific variant, price, and any applied discounts.
This implementation not only allows monitoring which products attract the most interest but also enables analysis of subsequent user behavior in relation to the specific characteristics of the viewed products. This supports targeted catalog optimizations and conversion strategies. The collected data can also be used to implement effective remarketing campaigns based on specific products or categories of demonstrated interest.
Add To Cart
The add_to_cart_ix event records the moment when a user adds a product to their cart. This represents an important indicator of commercial interest and forms a key intermediate step in the conversion funnel.
The dataLayer includes information about the currency used, the monetary value of the product added, and, when available, references to the originating list or collection. The items array contains detailed attributes of the added product, including a unique ID, SKU, product name, brand, complete categorization hierarchy (up to five levels), details of the selected variant, price, and quantity.
This level of detail enables precise analysis of which products attract the most user interest and their conversion potential. The information collected from this event is particularly useful for implementing targeted remarketing strategies and optimizing the shopping experience by identifying potential barriers in the purchase path, such as products frequently added but rarely purchased.
Remove From Cart
The remove_from_cart_ix event records the action of removing a product from the cart. This event is particularly useful for understanding abandonment and reconsideration behaviors during the purchase process.
The dataLayer contains information about the currency used, the value of the removed product, and the cart identifier. The items array includes all details of the removed product: unique ID, SKU, full name, brand, complete categorization hierarchy, selected variant, unit price, and quantity.
Tracking this event helps identify which products are frequently removed from carts, providing valuable insights into potential barriers to conversion, such as perceived high prices, uncertainty in decision-making, or last-minute changes of mind. These insights are crucial for optimizing product presentation, pricing strategies, or implementing effective cart recovery strategies through notifications or targeted emails, thereby increasing the chances of final conversion.
View Cart
The view_cart_ix event records the action of a user viewing the contents of their cart, a critical moment for evaluating the journey toward conversion.
The dataLayer includes essential information such as the currency used (currency) and the total cart value (value), which represents the sum of the prices of all products in the cart. The items array contains comprehensive details for each product in the cart: unique ID, SKU, full name, store affiliation, any applied discounts, original position, brand, complete categorization hierarchy (up to 5 levels), originating list information (ID and name), selected variant with its ID, unit price, and quantity.
Tracking this event is particularly useful for analyzing user behavior at this intermediate stage of the funnel, measuring cart abandonment rates, and implementing effective recovery strategies. Additionally, it provides valuable insights into the average cart composition in terms of product variety, quantity, and value.
Begin Checkout
The begin_checkout_ix event represents the start of the checkout process when the user decides to proceed with purchasing the products in their cart.
The dataLayer includes essential parameters such as the currency used (currency), the total potential order value (value), and detailed information about every product included in the checkout. The items field contains comprehensive details for each product: unique product ID (item_id), SKU code, full name, store affiliation, any discounts applied, position in the original list, brand, complete categorization hierarchy (up to 5 levels), identifiers of the originating list, specific variant code and ID, unit price, and quantity.
These data points enable in-depth analysis of user behavior during the initial checkout phase, helping identify potential obstacles and opportunities to optimize the conversion process.
Important Note: It is important to note that this event is not visible in Google Tag Manager’s preview mode on Shopify stores without a Plus plan. This is because Shopify treats the checkout page as a protected "black box," limiting access for external tools. However, InnexDATA implements an advanced solution capable of overcoming this limitation, effectively retrieving all the necessary data to track checkout events on any Shopify store, including those with standard plans. This guarantees full visibility of the conversion funnel, even in areas typically inaccessible to traditional tracking tools, ensuring the integrity of analytical data throughout the purchase journey.
Tracking this event is crucial for analyzing the effectiveness of the checkout process and identifying potential abandonment points.
Add Shipping Info
The add_shipping_info_ix event records the moment when a user selects a shipping method during the checkout process.
The dataLayer includes critical parameters such as the total order value (value), the amount of taxes (tax), the shipping cost (shipping—often 0 for free shipping), the specific shipping method selected (shipping_tier), and any applied coupon (coupon). The items array maintains detailed tracking of each product in the checkout, including unique ID, SKU, full name, store affiliation, discount, original position, brand, complete categorization hierarchy, originating list information, specific variant code and ID, unit price, and quantity.
These data points allow for analysis of the impact of shipping policies on conversions, identifying customer preferences and potential abandonment points related to costs or available delivery options.
Add Payment Info
The add_payment_info_ix event records the moment when a user selects or enters a payment method during the checkout process.
The dataLayer includes essential transaction information such as the currency used (currency), the total order value (value), any applied coupon (coupon), and the selected payment method (payment_type, e.g., "Credit Card," "PayPal," etc.).
The items array provides complete tracking of all products in the checkout, with detailed information for each item: unique ID, SKU, product name, store affiliation, applied discount, original position, brand, complete categorization hierarchy (up to 5 levels), originating list details, selected variant details, unit price, and quantity.
This event is crucial for analyzing user payment preferences and identifying potential issues or abandonment related to specific payment methods.
Purchase
The purchase_ix event represents the completion of a purchase and serves as the ultimate goal of the e-commerce conversion funnel.
This dataLayer is particularly rich in fundamental transactional information: a unique order identifier (transaction_id), the order name in the Shopify system (order_name), the total purchase value (value) calculated as the sum of price × quantity for all items, the amount of taxes (tax), the shipping cost (shipping), the currency used (currency), and any applied coupon code (coupon). The items array contains complete details for each purchased product, including unique ID, SKU, full name, store affiliation, specific discount, original position, brand, complete categorization hierarchy (up to 5 levels), originating list information, selected variant with its ID, unit price, and purchased quantity.
The granularity of this data enables in-depth analysis of average order value, products driving conversions, and the overall profitability of different product categories.
User Data
The user_data_ix event collects detailed information about the user, which can be leveraged for various marketing and analysis purposes.
Key aspects to note:
- Billing vs. Shipping Data: Parameters with the _sh suffix refer to shipping address details, which may differ from billing address details.
- Privacy and Security: Sensitive identifiers such as email and phone number are stored both in their original form (for operational purposes) and as hashed versions (for analysis and targeting), ensuring compliance with privacy regulations.
- Customer Value Metrics: Parameters like ltv, total_order, and total_order_value are essential for segmenting customers based on their value and purchase behavior.
- Order History: Timestamps for first and last orders (first_order_date and last_order_date) enable analysis of purchase frequency and identification of inactive customers who may require reactivation campaigns.
- Segmentation: The customer_group field allows separation of consumer (B2C) and business (B2B) customers for differentiated marketing strategies.
This user data structure enables advanced analyses such as RFM (Recency, Frequency, Monetary) segmentation, personalized campaigns, and loyalty strategies based on historical customer behavior.
Google Tag Manager Template
GA4
Download the GA4 Template from the InnexDATA Plugin
1. From the Template Download Section in the InnexDATA plugin, based on the current installation status, select the option "Include for the GA4 Template.
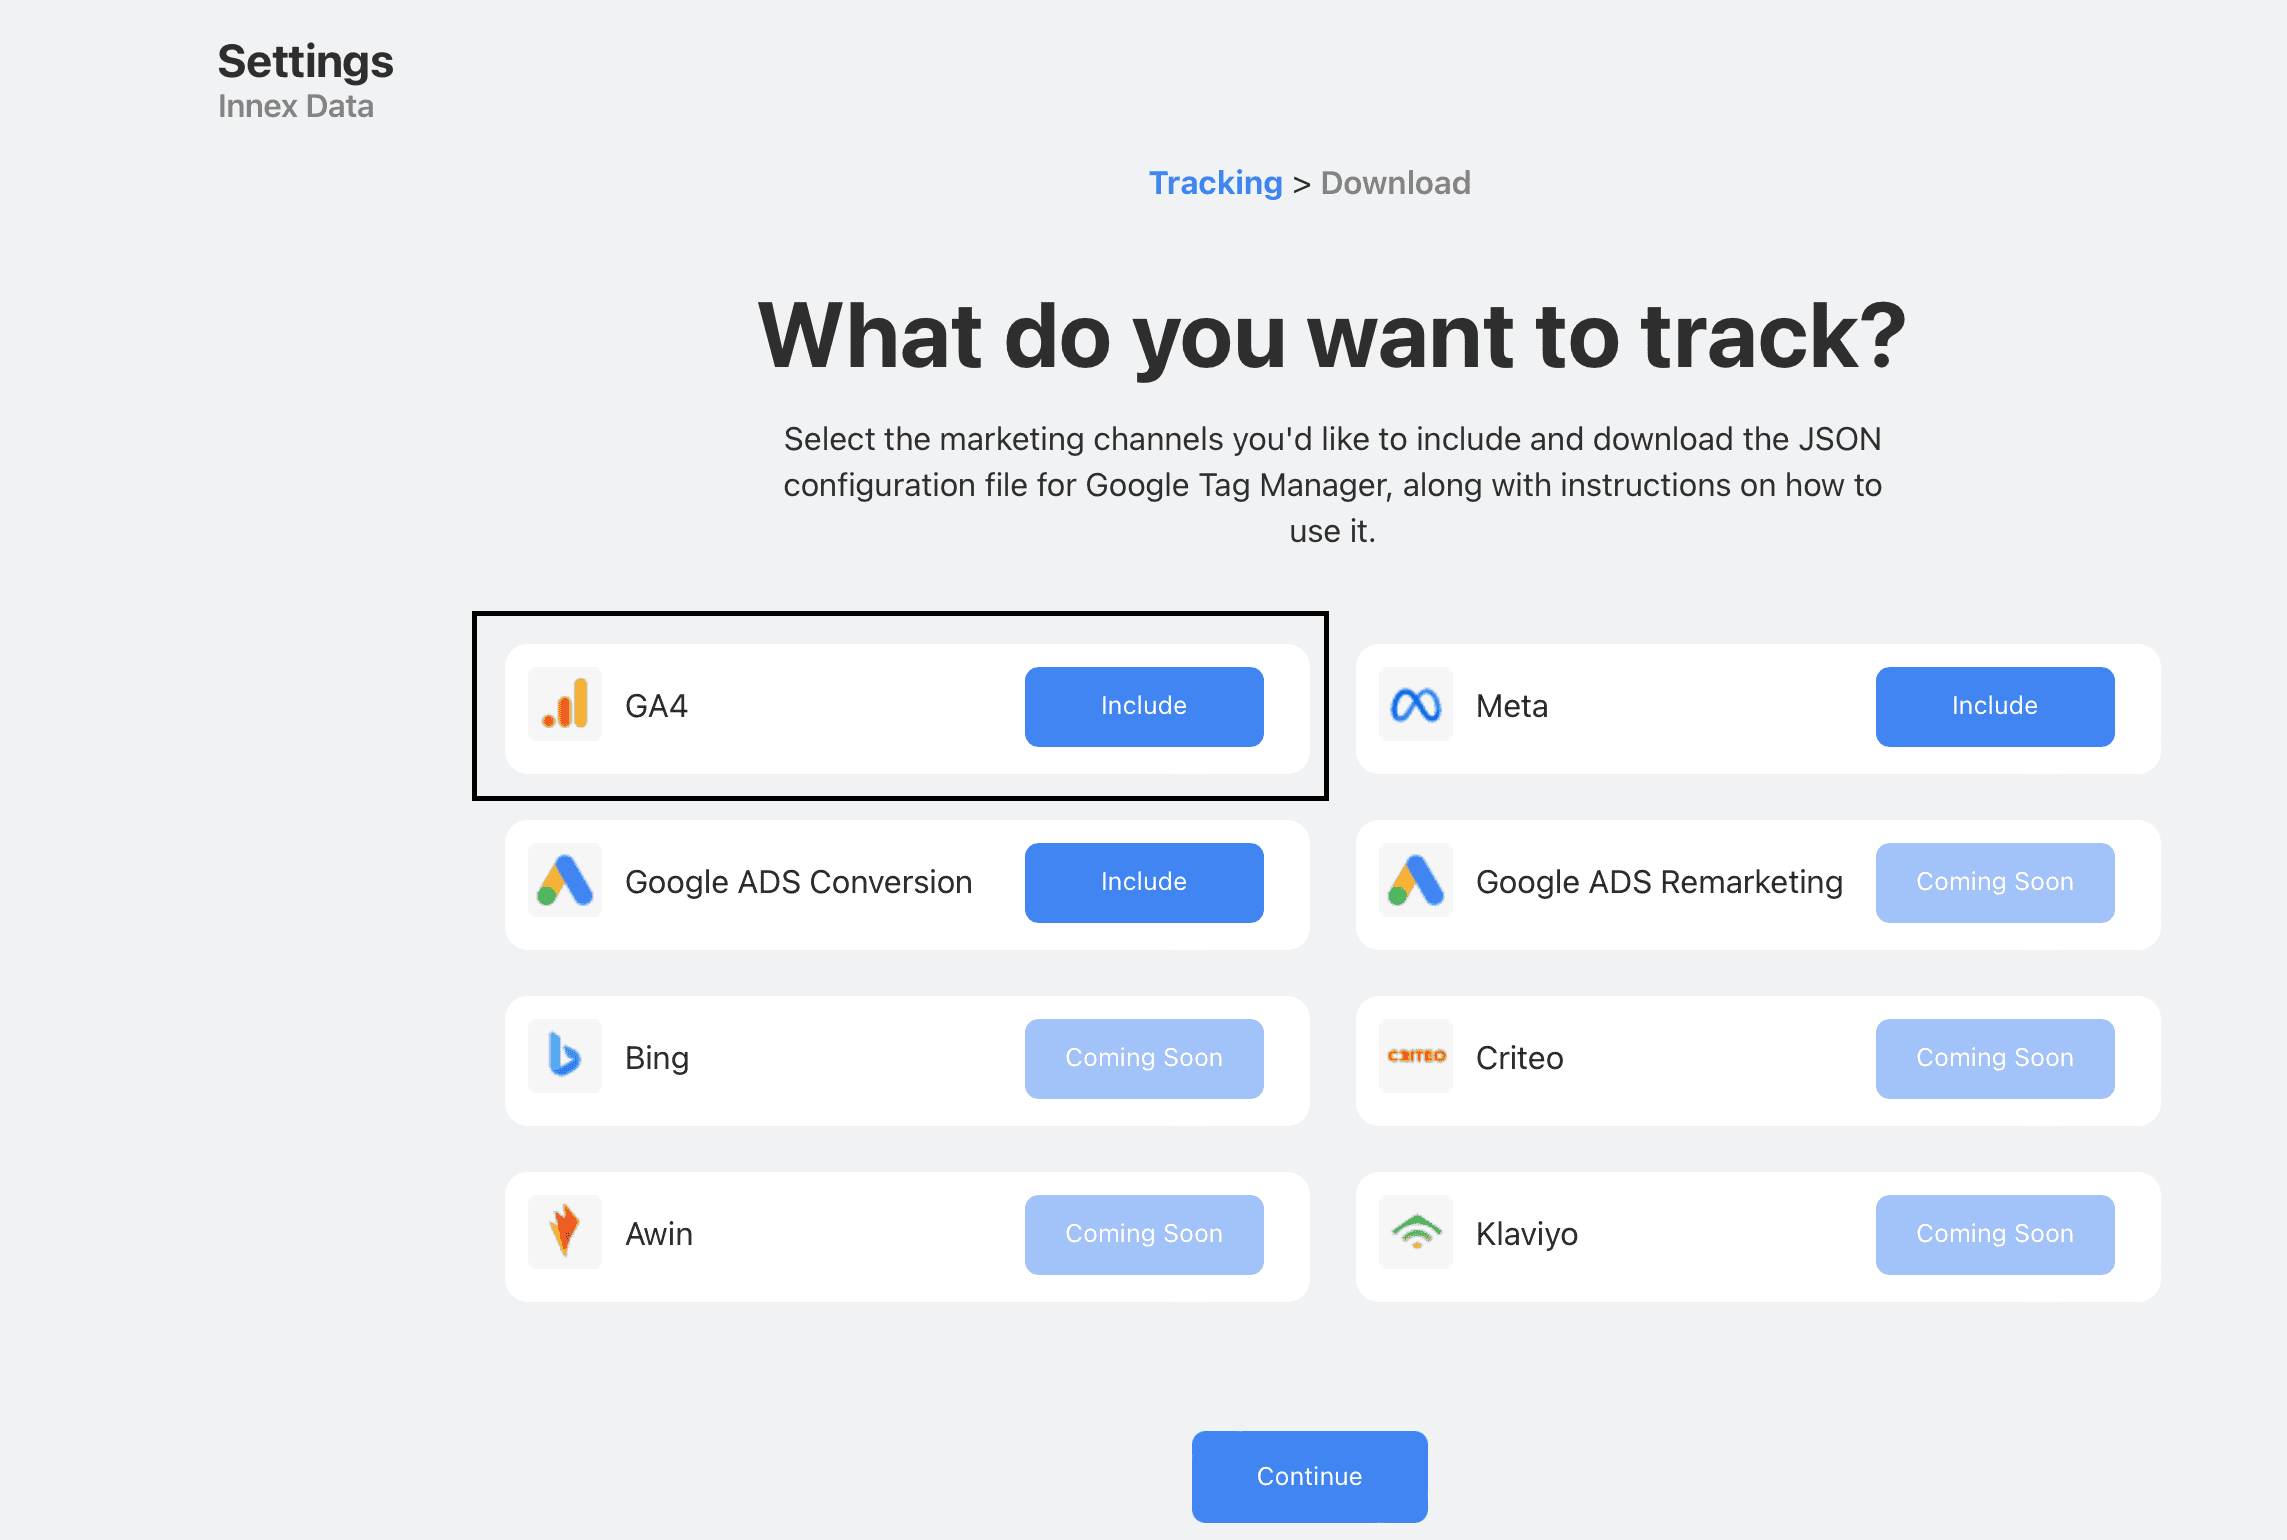
2. Once the template is selected, click on"Download" to save the corresponding file.
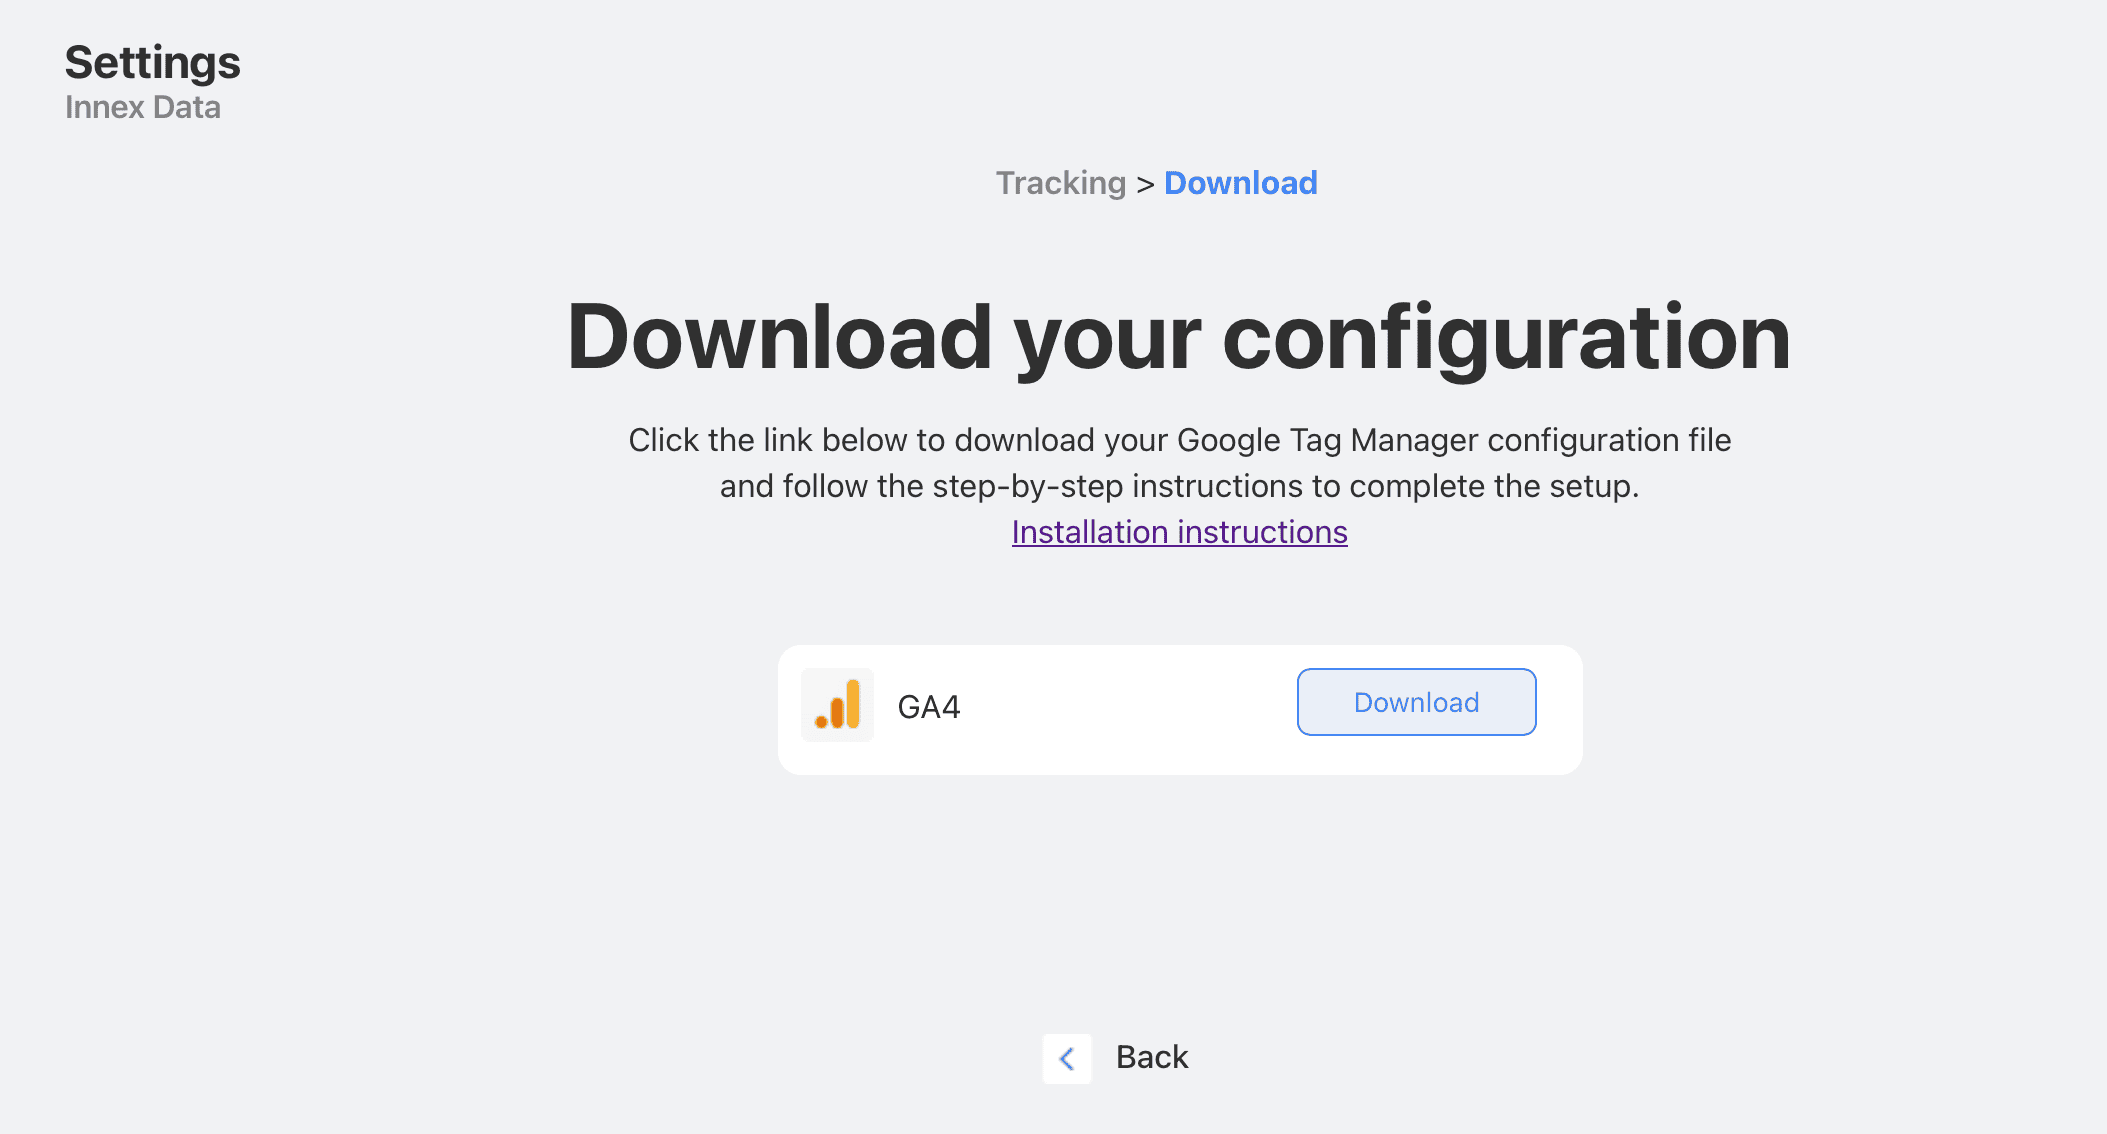
Importing the Template into Google Tag Manager
1. Log into your Google Tag Manager account.
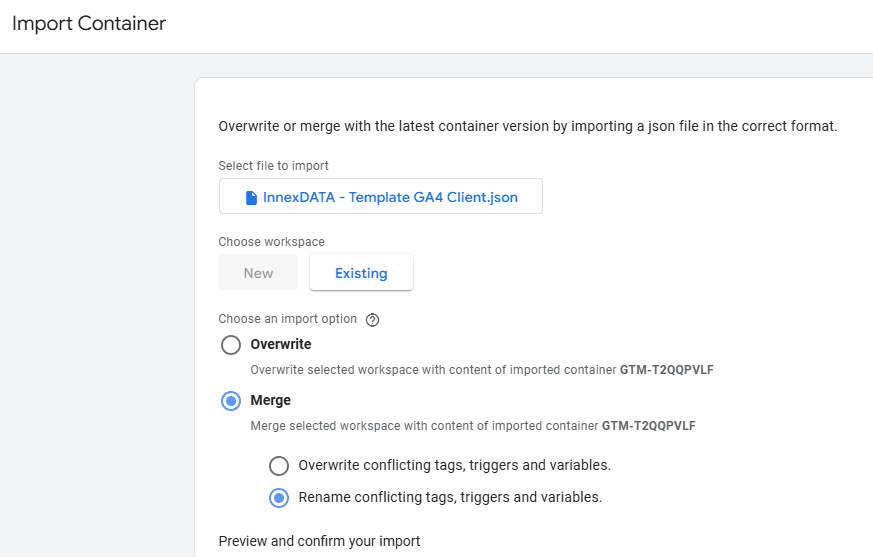
2. Navigate to the "Admin" section and click on "Import Container".

3. Select the recently downloaded file, named "InnexDATA - Template Client GA4.json".
4. Choose whether to import the template into a new Workspace or an existing one.
5. Select the options "Merge" and "Rename" to avoid accidental overwrites of other tags already present in the Workspace.
- Tip: It's recommended to start with a blank Google Tag Manager environment for optimal initial configuration management.
6. Complete the import by clicking on the button in the bottom-right corner: "Add to Workspace".
Configuring the GA4 Measurement ID
After the import, you will have access to the entire GA4 stack pre-configured by InnexDATA, optimized for proper data tracking on your platform.
The only manual adjustment required is updating your Measurement ID, which is currently set to an example value:
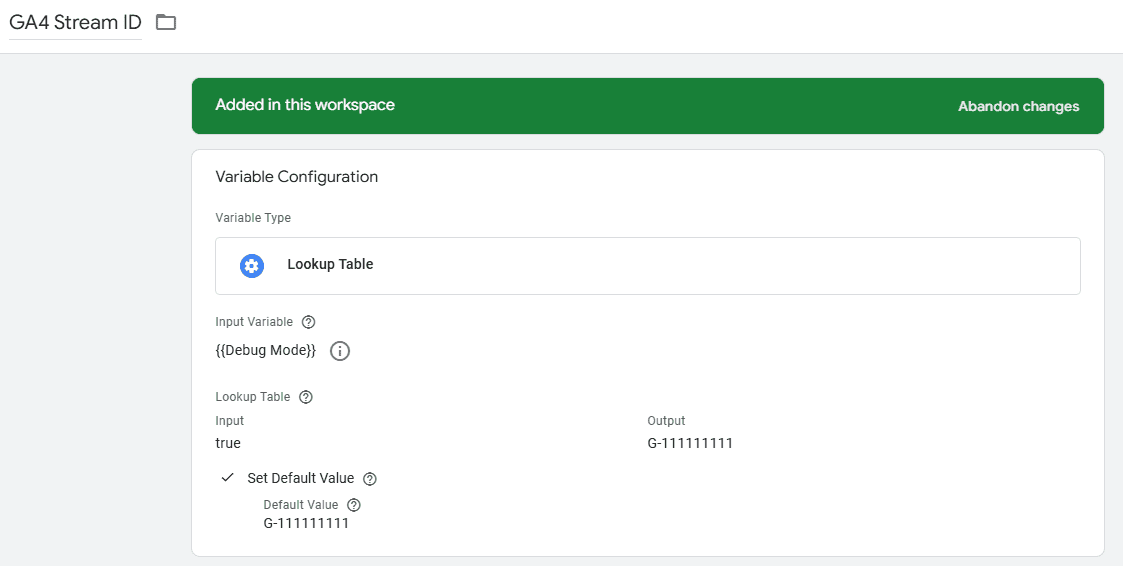
1. Open the "Variables" section from the side menu.
2. Locate the variable "G4 Stream ID" and click on it to edit.
3. Replace the example value (e.g., `G-1111111`) with your actual GA4 Measurement ID.
Implementation Scenarios and Best Practices
There are two potential Measurement ID setup scenarios, depending on your current tracking implementation status:
1. You Have a Debug Property:
- Enter the Measurement ID for the debug property under the "Output" field.
- Enter the official (production) Measurement ID under the "Default Value" field.
- This configuration prevents contaminating the official property with debug data.
2. You Do Not Have a Debug Property:
- Enter your official Measurement ID in both fields ("Output" and "Default Value").
- This ensures tracking is correctly active across all scenarios.
Testing and Publishing
After completing the configuration, proceed with testing and publishing:
1. Use the Preview Mode in GTM to verify that all events are being correctly triggered and sent.
2. Once testing is successfully completed:
- Click on "Publish" in the top-right corner.
- Add a description (optional but recommended) and confirm the publication of the Workspace.
Your GA4 tracking will now be fully active on your platform!
Need Help?
If you encounter any issues, feel free to reach out to us at support@innexdata.io, and we’ll be happy to assist you!
Google Ads
Download the Google ADS Template from the InnexDATA Plugin
1. From the Template Download Section in the InnexDATA plugin, based on the current installation status, select the option "Include" for the Google ADS Conversion Template.
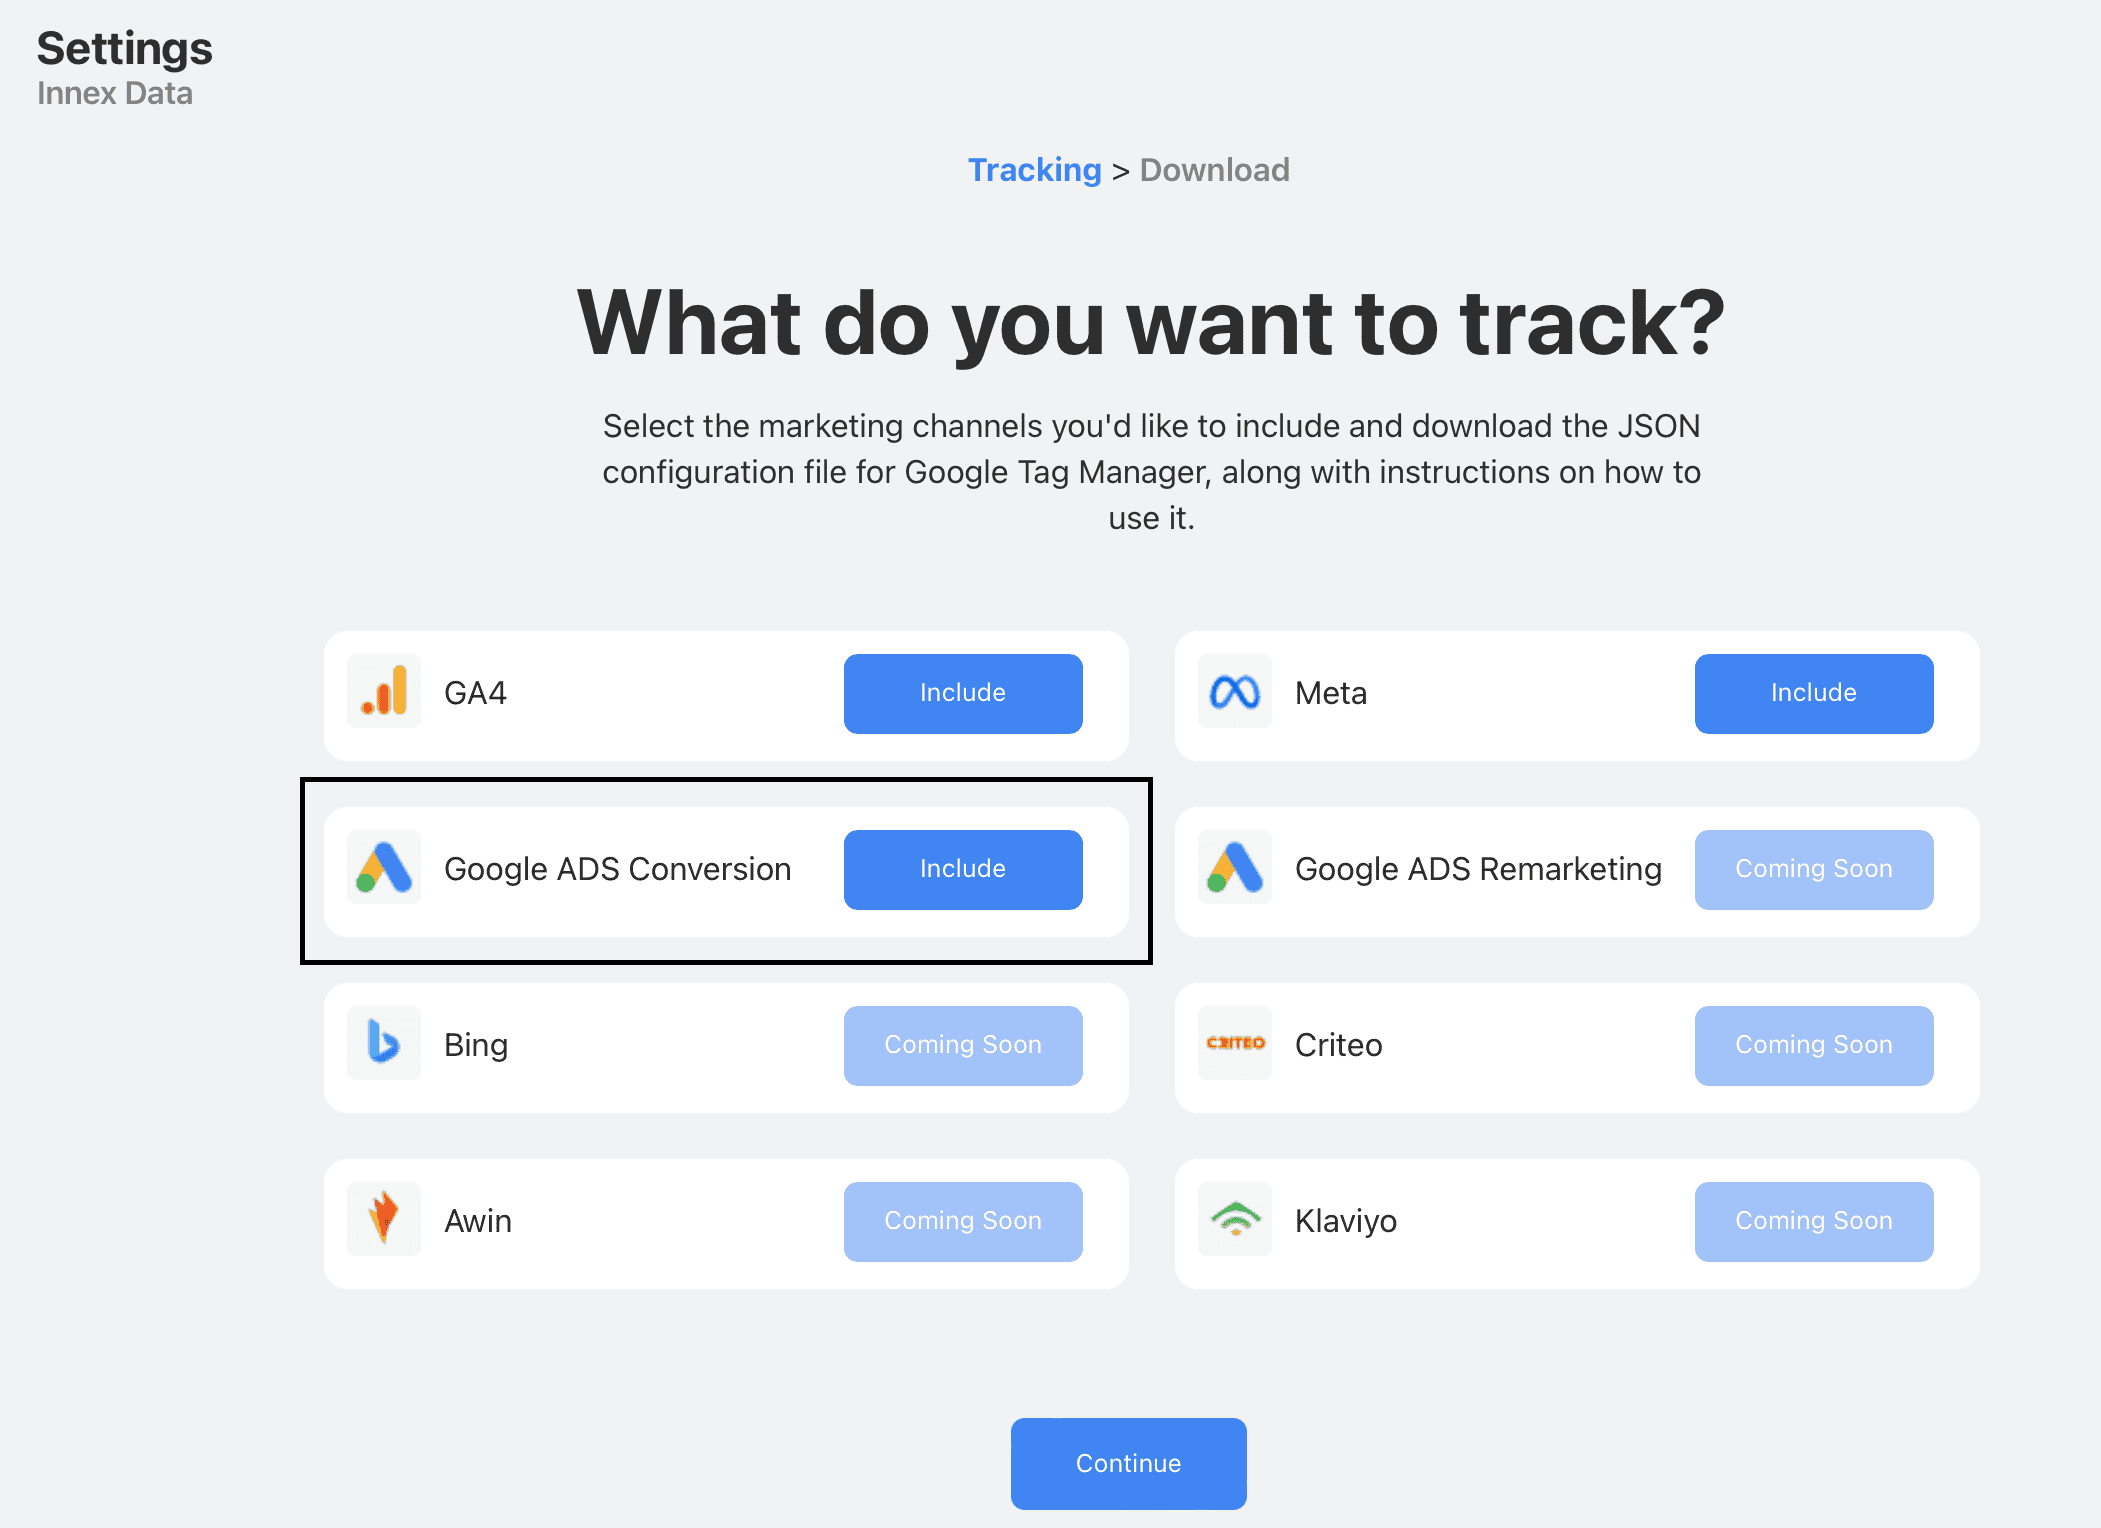
2. Once the template is selected, click on "Download" to save the corresponding file.

Importing the Template into Google Tag Manager
1. Log into your Google Tag Manager account.
2. Navigate to the "Admin" section and click on "Import Container".

3. Select the recently downloaded file, named "InnexDATA - Template Client Google ADS.json".
4. Choose whether to import the template into a new Workspace or an existing one.
5. Select the options "Merge" and "Rename" to avoid accidental overwrites of other tags already present in the Workspace.
- Note: This template only includes what is necessary for Google ADS to function, so there are no overwrites. However, it is recommended to install the GA4 Template first.
6. Complete the import by clicking the button in the bottom-right corner: "Add to Workspace".

Configuring the Google ADS Conversion ID
Once imported, you will have access to the entire Google ADS stack preconfigured by InnexDATA, optimized for accurate data tracking on your platform.
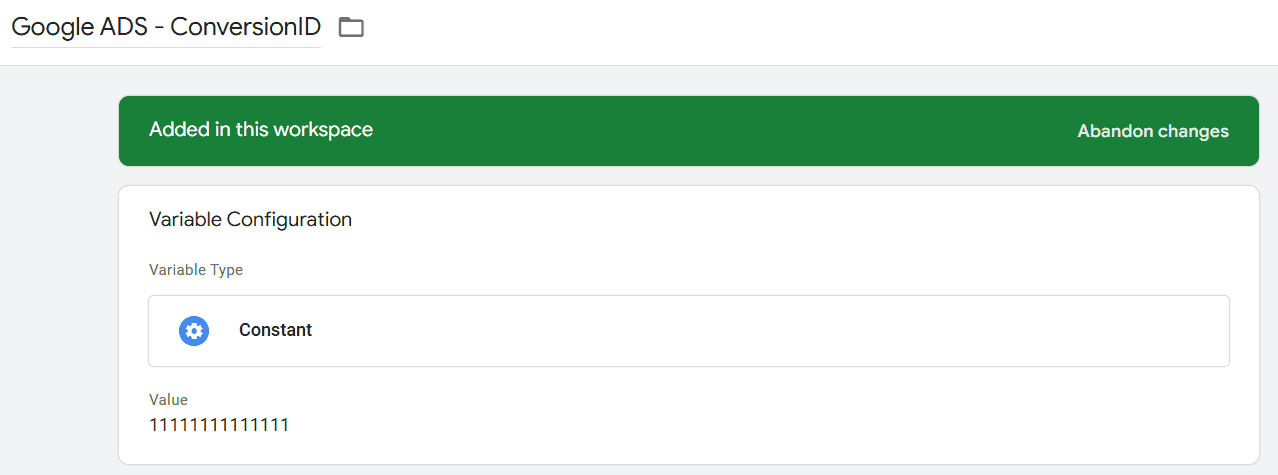
The only manual adjustment required is updating the Conversion ID, which is currently set to an example value:
1. Open the "Variables" section from the side menu.
2. Locate the variable "Google ADS - ConversionID" and click on it to edit.
3. Replace the example value (e.g., `11111111111`) with your actual Google ADS Conversion ID.
Where to Find the Conversion ID in Google ADS
If you don’t know where to find your Conversion ID, follow these steps:
1. Open your Google ADS Account.
2. Click on Goals in the left-hand menu and go to the Summary section.
3. In the list of conversions set up in your account, click on one to view its details.
4. Scroll down to the "Tag Setup" section and click it. This will open the available installation methods for the conversion.
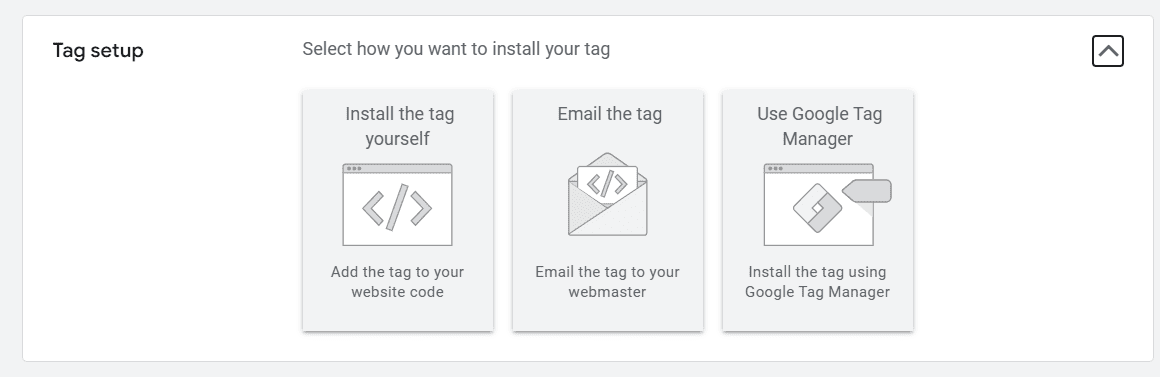
5. Select "Use Google Tag Manager" and copy the Conversion ID provided.
6. Return to your Google Tag Manager Account and replace the example value in the Conversion ID variable with this value. From now on, all conversions will use the correct Conversion ID.
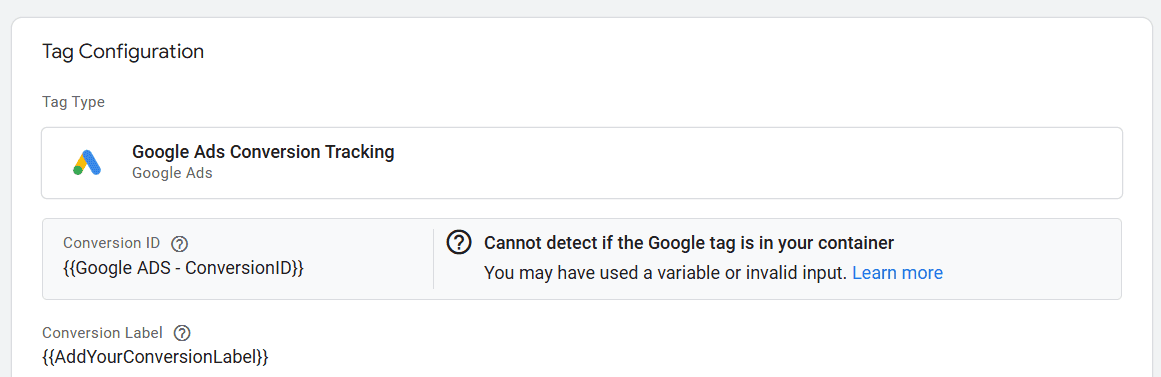
Configuring the Conversion Label
Once the Conversion ID variable is set for all active conversions, you’ll need to replace the placeholder "AddYourConversionLabel" in each TAG.
To do this:
1. Access each conversion set up in Google ADS (or create new conversions if needed).
2. Repeat the same steps from the previous section to copy the Conversion Label this time.
3. You don’t need to create a variable for each label. Simply replace the placeholder value in the appropriate field of the TAG with the actual Conversion Label from Google ADS.
Once all Conversion Labels are set within the TAG section, you can proceed to testing and publishing.
Testing and Publishing
After completing the configuration, proceed with testing and publishing:
1. Use the Preview Mode in GTM to ensure that all conversions are correctly triggered and sent.
2. If there are any conversions you don’t want to track, simply pause the corresponding TAG.
3. Once testing is successfully completed:
- Click on "Publish" in the top-right corner.
- Add a description (optional but recommended) and confirm the publication of the Workspace.
From this moment, Google ADS conversion tracking will be fully active on your platform!
Need Help?
If you encounter any issues, feel free to reach out to us at support@innexdata.io, and we’ll be happy to assist you!
TikTok
Download the TikTok Template from the InnexDATA Plugin
1. From the Template Download Section in the InnexDATA plugin, based on the current installation status, select the option "Include" for the TikTok Template.

2. Once the template is selected, click on "Download" to save the corresponding file.

Importing the Template into Google Tag Manager
1. Log into your Google Tag Manager account.
2. Navigate to the "Admin" section and click on "Import Container".

3. Select the recently downloaded file, named "InnexDATA - Template Client TikTok.json".
4. Choose whether to import the template into a new Workspace or an existing one.
5. Select the options "Merge" and "Rename" to avoid accidental overwrites of other tags already present in the Workspace.
- Note: This template only includes what is necessary for TikTok to function, so there are no overwrites. However, it is recommended to install the GA4 Template first.
6. Complete the import by clicking the button in the bottom-right corner: "Add to Workspace".

Configuring the TikTok Pixel
Once imported, you will have access to the entire TikTok stack preconfigured by InnexDATA, optimized for accurate data and conversion tracking on your platform.
The only manual adjustment required is updating the TikTok Pixel, which is currently set to an example value:
1. Open the "Variables" section from the side menu.
2. Locate the variable "TikTok - Pixel" and click on it to edit.
3. Replace the example value (e.g., `11111111111`) with your actual TikTok Pixel ID.

Where to Find the TikTok Pixel
If you don’t know where to find your TikTok Pixel, follow these steps:
1. Open your TikTok Ads Manager Account.
2. Click on Tools in the top menu and go to the "Events" section.
3. Under Web Events, click the Manage button, and you’ll be redirected to the "Create Pixel" section.
4. When clicking that button, the TikTok Pixel code will appear. Copy only the value inside the `ttq.load` field.

5. Return to your Google Tag Manager Account and replace the example value in the Pixel variable with this value. From now on, all conversions will use the correct TikTok Pixel.
Implementation Scenarios and Best Practices
Once the Pixel variable is set for all active conversions, no further actions are required because the downloaded template already has all variables perfectly configured for the correct actions.
Testing and Publishing
After completing the configuration, proceed with testing and publishing:
1. Use the Preview Mode in GTM to ensure that all conversions are correctly triggered and sent.
2. If there are any conversions you don’t want to track, simply pause the corresponding TAG.
3. Once testing is successfully completed:
- Click on "Publish" in the top-right corner.
- Add a description (optional but recommended) and confirm the publication of the Workspace.
From this moment, TikTok conversion tracking will be fully active on your platform!
Need Help?
If you encounter any issues, feel free to reach out to us at support@innexdata.io, and we’ll be happy to assist you!
META
Download the META Template from the InnexDATA Plugin
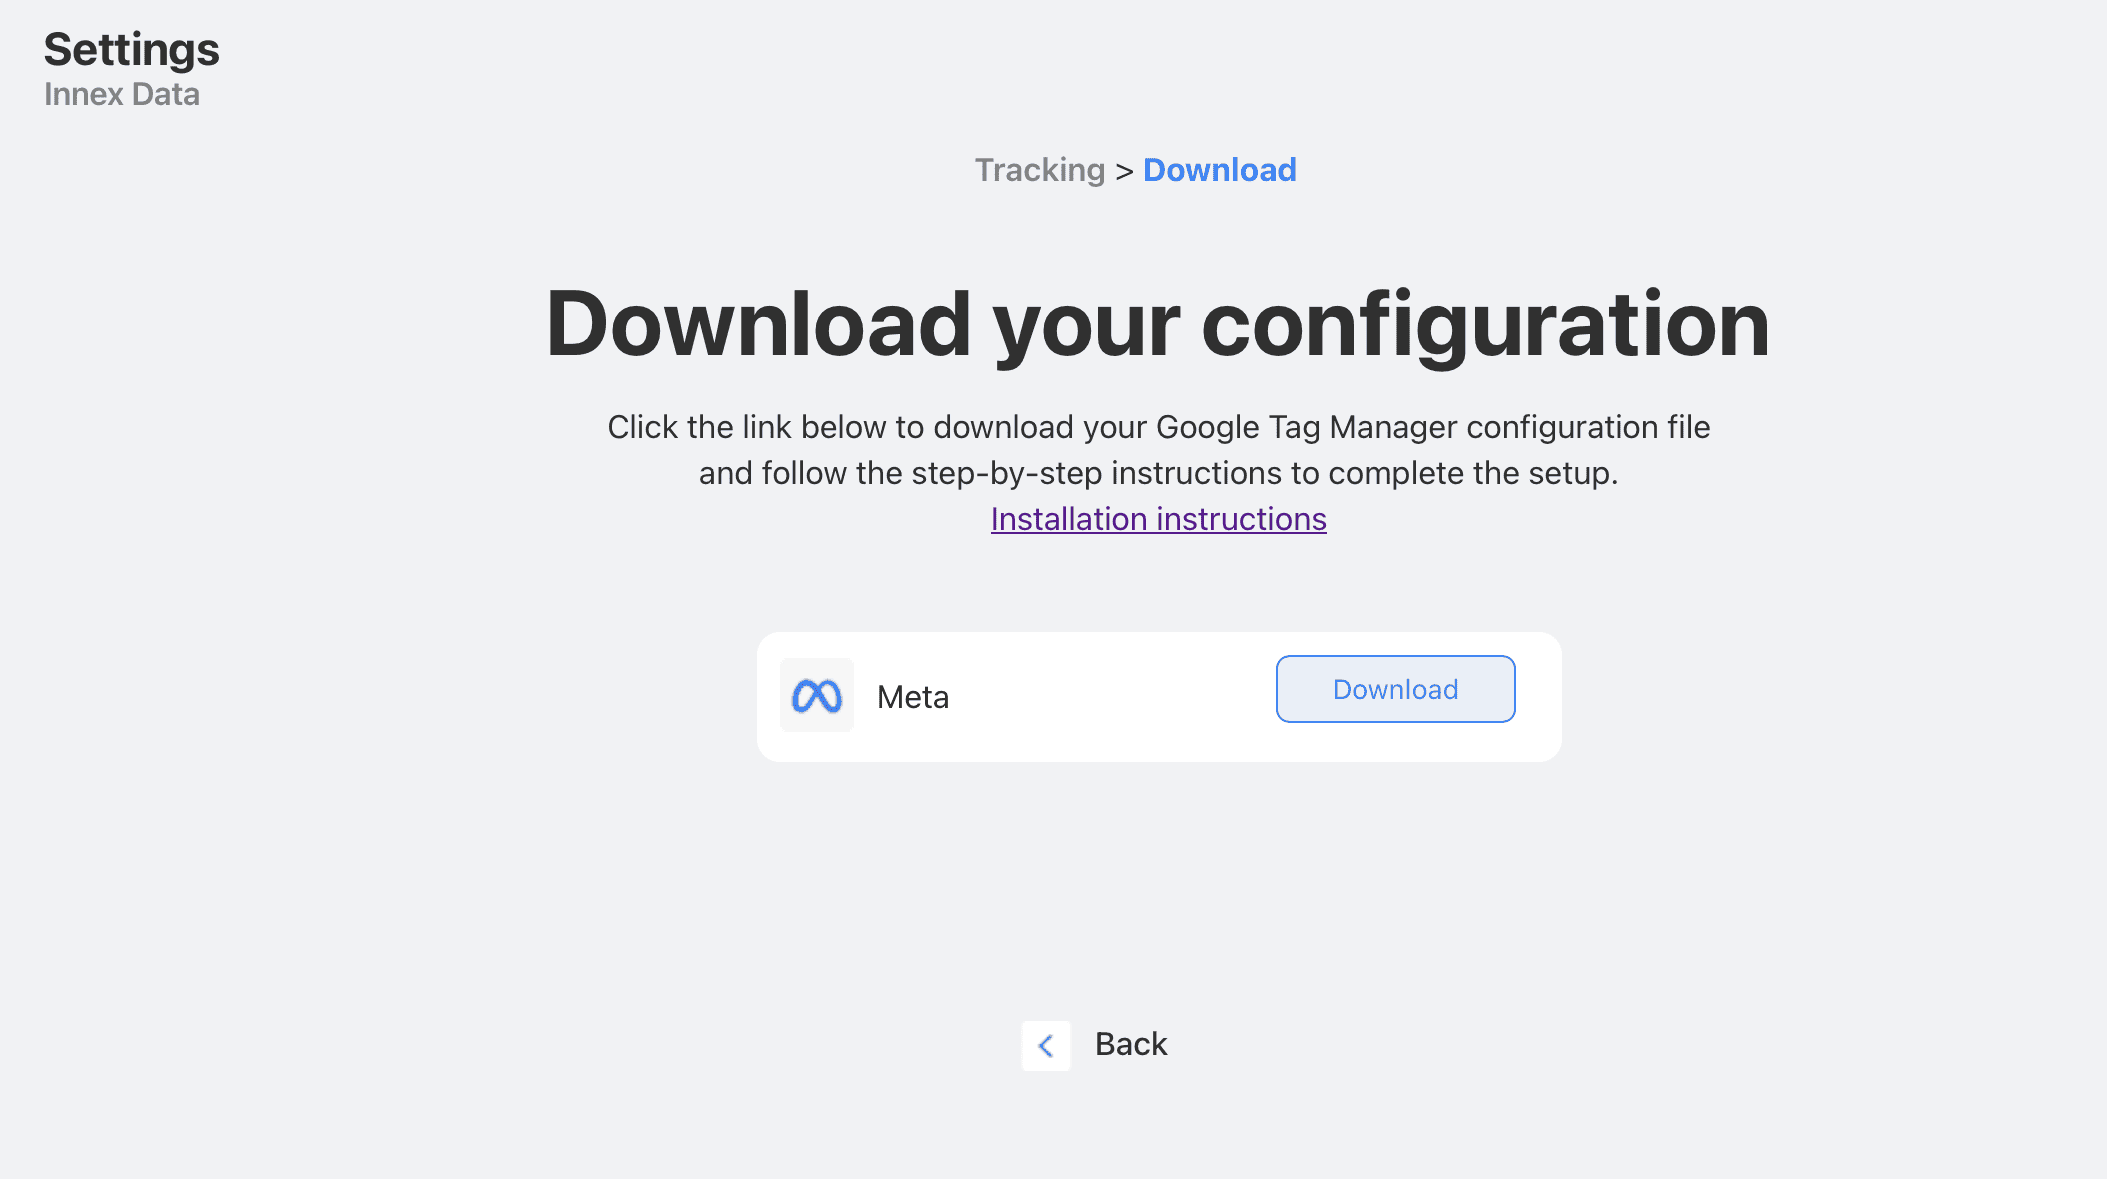
1. From the Template Download Section in the InnexDATA plugin, based on the current installation status, select the option "Include" for the META Template.
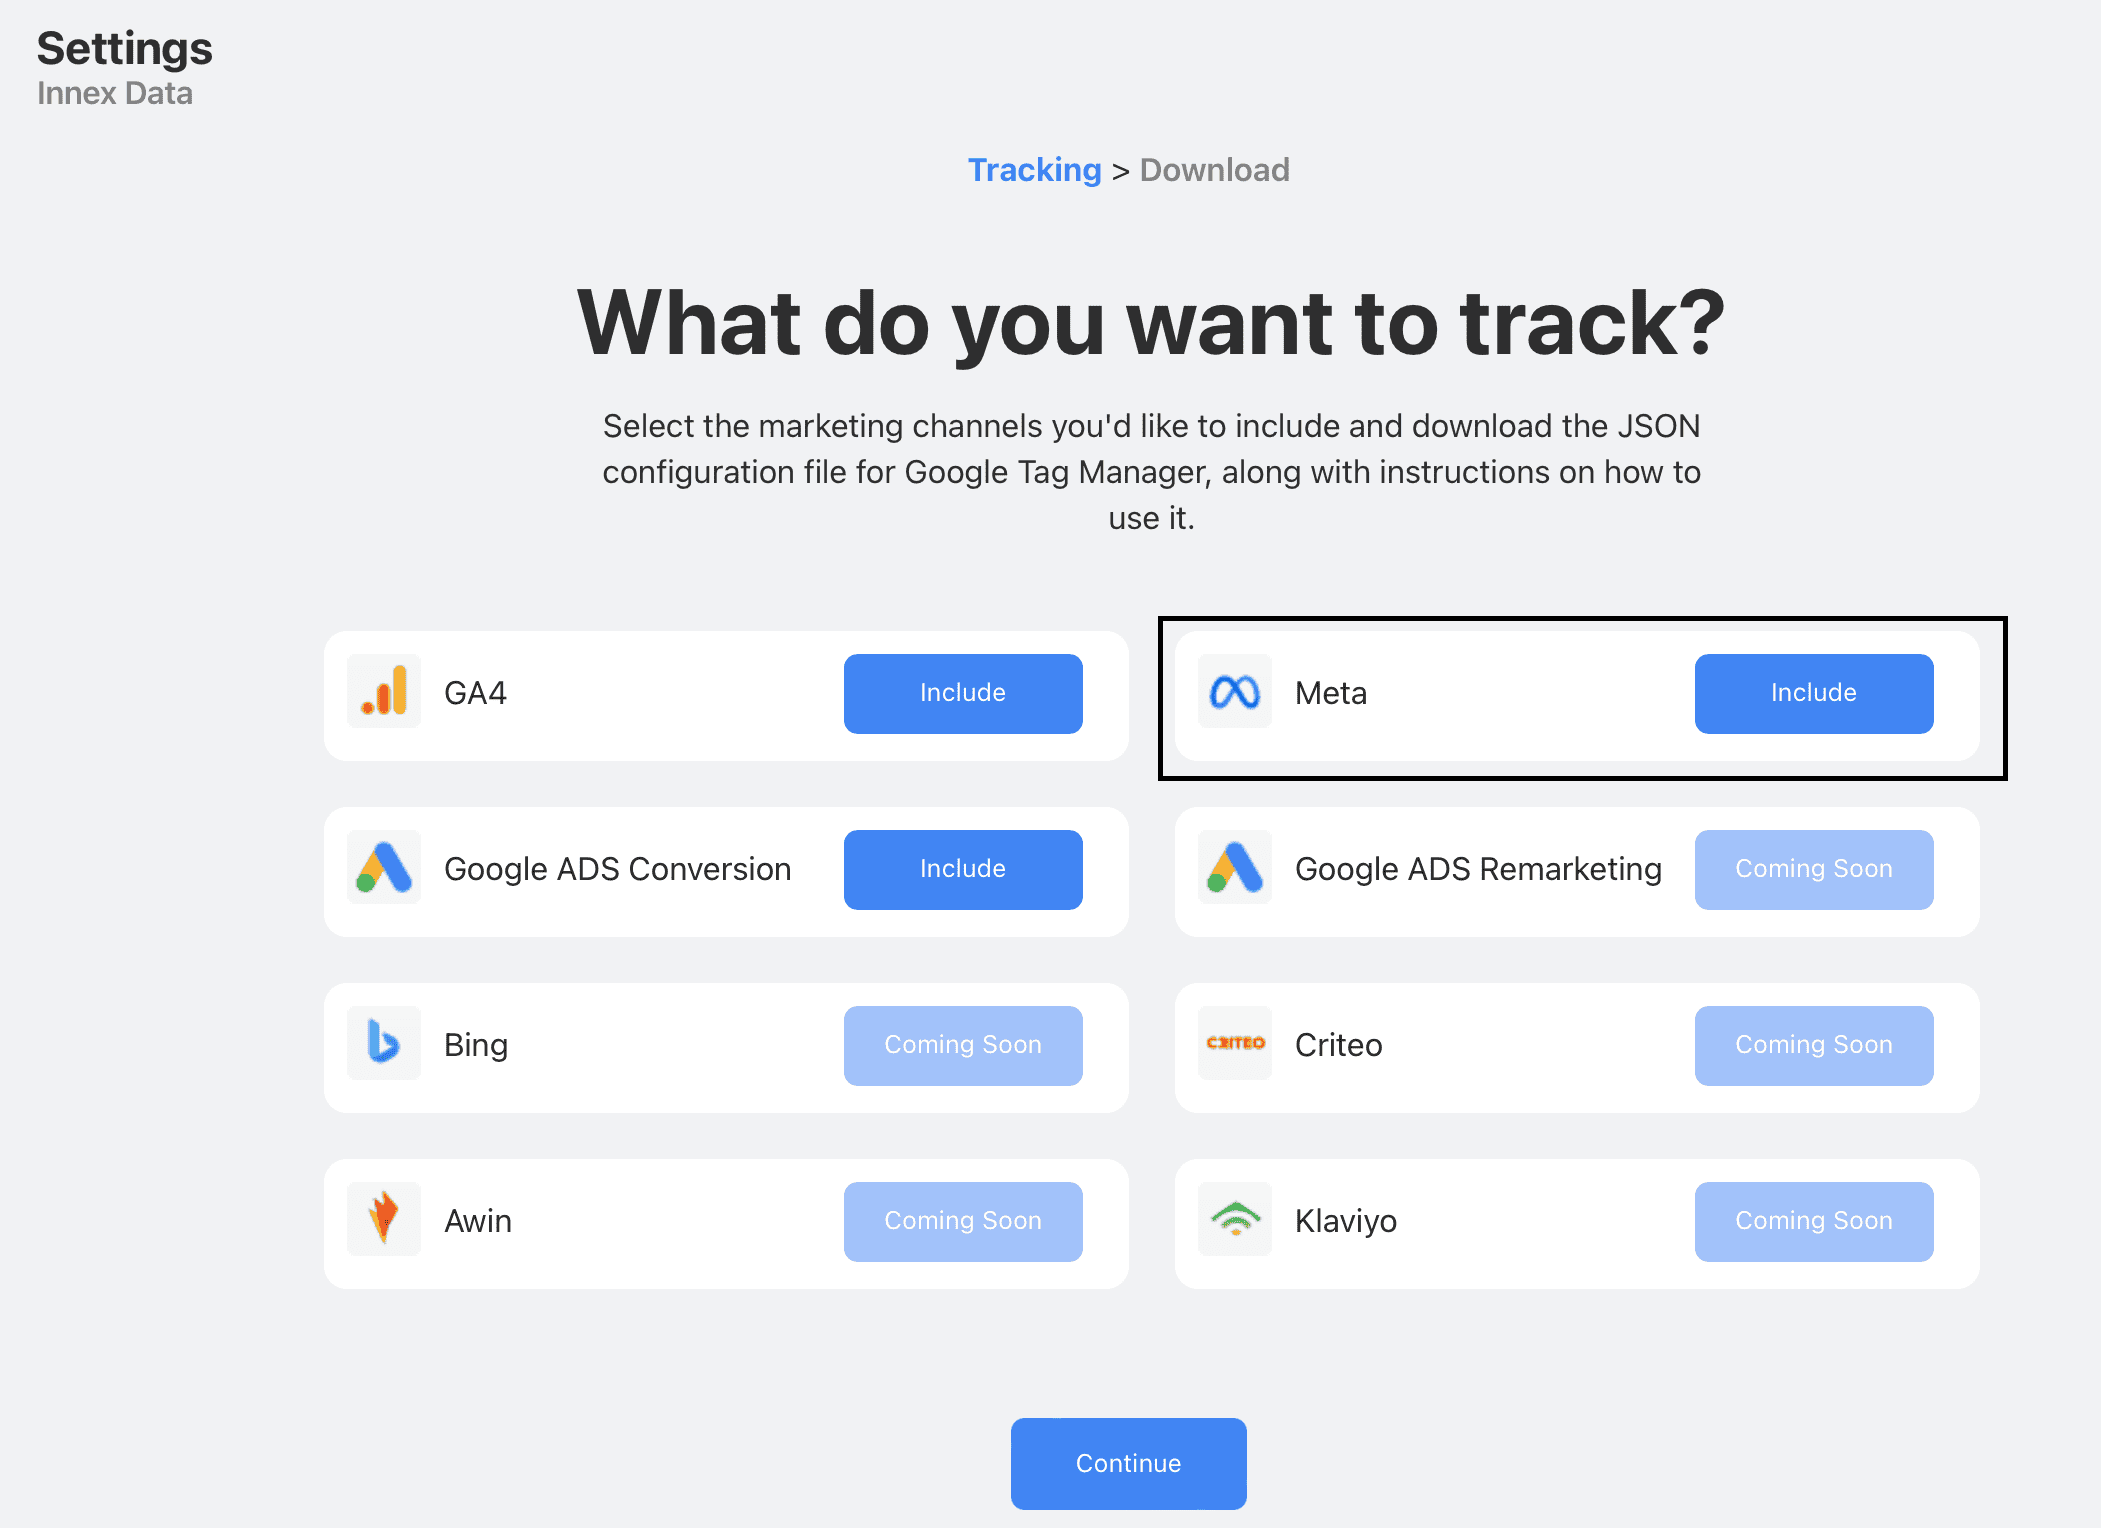
2. Once the template is selected, click on "Download" to save the corresponding file.
Importing the Template into Google Tag Manager
1. Log into your Google Tag Manager account.
2. Navigate to the "Admin" section and click on "Import Container".
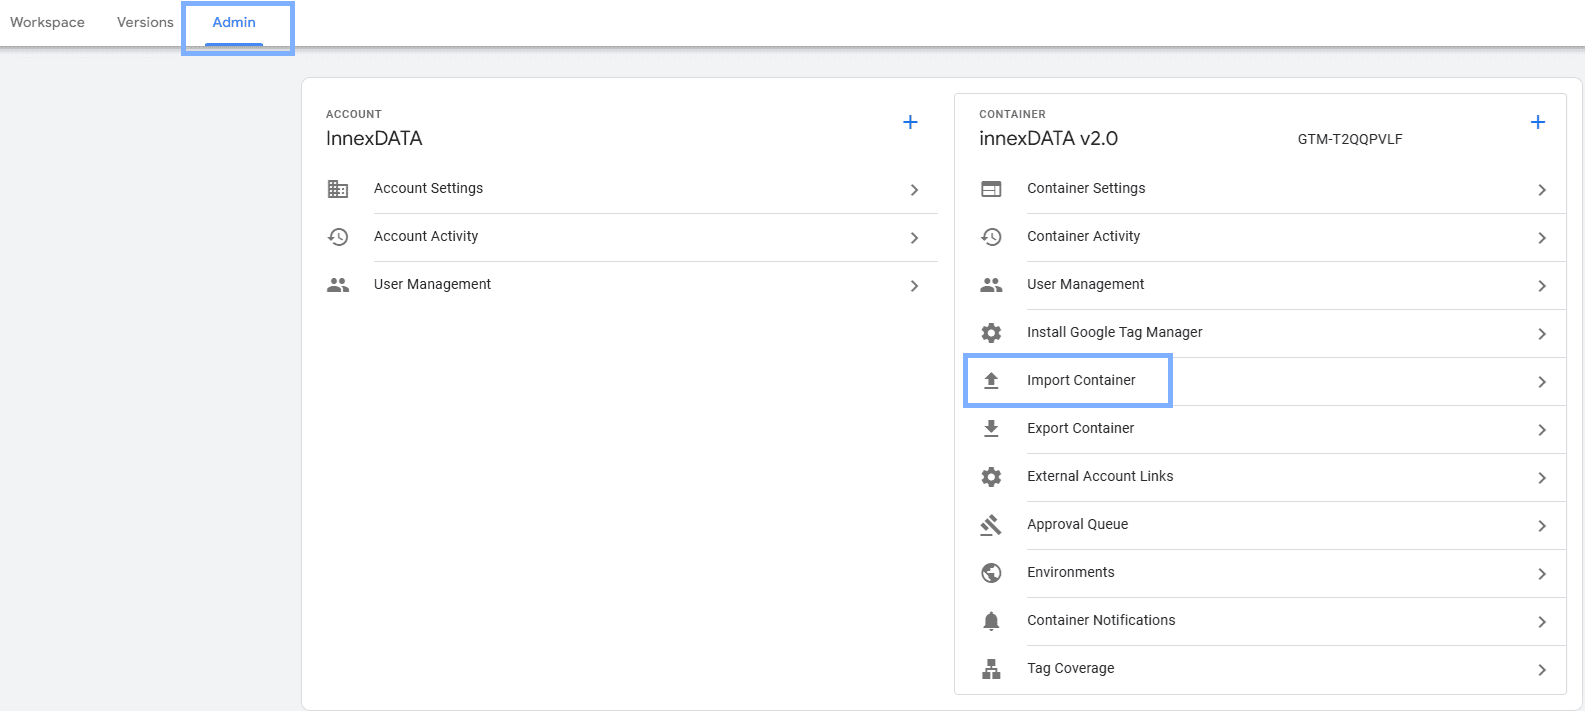
3. Select the recently downloaded file, named "InnexDATA - Template Client META.json".
4. Choose whether to import the template into a new Workspace or an existing one.
5. Select the options "Merge" and "Rename" to avoid accidental overwrites of other tags already present in the Workspace.
- Note: This template only includes what is necessary for META to function, so there are no overwrites. However, it is recommended to install the GA4 Template first.
6. Complete the import by clicking the button in the bottom-right corner: "Add to Workspace".

Configuring the META Pixel
Once imported, you will have access to the entire META stack preconfigured by InnexDATA, optimized for accurate data and conversion tracking on your platform.
The only manual adjustment required is updating the META Pixel, which is currently set to an example value:
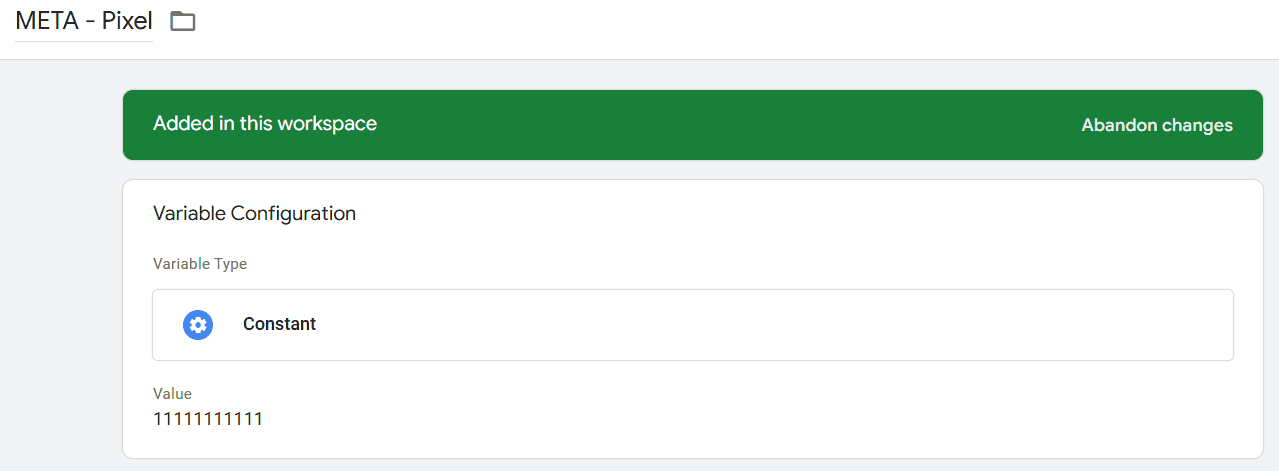
1. Open the "Variables" section from the side menu.
2. Locate the variable "META - Pixel" and click on it to edit.
3. Replace the example value (e.g., `11111111111`) with your actual META Pixel ID.
Where to Find the META Pixel
If you don’t know where to find your META Pixel, follow these steps:
- Log in to Meta Business Manager
- Navigate to business.facebook.com and log in using your account credentials.
- Access Business Settings
- From the left-hand navigation menu, click "Business Settings".
- Navigate to "Data Sources" -> "Pixels"
- In the left menu, select "Data Sources", then choose "Pixels".
- Select the Desired Pixel
- A list of your Pixels will appear. Click on the Pixel you wish to use.
- Copy the Pixel ID
- At the top of the page, underneath the Pixel name, you'll see the numerical Pixel ID (e.g., 123456789012345).
- Return to your Google Tag Manager Account and replace the example value in the Pixel variable with this value. From now on, all conversions will use the correct META Pixel.
Implementation Scenarios and Best Practices
Once the Pixel variable is set for all active conversions, no further actions are required because the downloaded template already has all variables perfectly configured for the correct actions.
Testing and Publishing
After completing the configuration, proceed with testing and publishing:
1. Use the Preview Mode in GTM to ensure that all conversions are correctly triggered and sent.
2. If there are any conversions you don’t want to track, simply pause the corresponding TAG.
3. Once testing is successfully completed:
- Click on "Publish" in the top-right corner.
- Add a description (optional but recommended) and confirm the publication of the Workspace.
From this moment, META conversion tracking will be fully active on your platform!
Need Help?
If you encounter any issues, feel free to reach out to us at support@innexdata.io, or write us in chat and we’ll be happy to assist you!